
(This posting includes a links handouts which you are welcome to use with your students.)
This posting is a more detailed response to my interview question on Day 4 LINCS Discussion: Student-Centered Approach to Teaching Writing Skills. .
Below in blue, you’ll find the details that I’ve added to the Day 4 LINCS’ posting.
I have some interactive activities that I include during each writing unit.
They do give variety to a writing class, but more importantly, they are effective in helping students develop their writing and editing skills.
1) Writer-in-control peer editing. Type 1: Writers prepare questions.
In traditional peer-editing activities, the students read a classmate’s essay and give feedback by filling out a teacher-provided questionnaire, rubric or checklist. (For example, “Is the topic sentence clear?” “Are the verb tenses correct?”)
For this non-traditional approach below, the writers have control over the type of feedback they want. Here are the steps:
Step 1: (A model) Sample essay and peer editing questions. In order to demonstrate to students how they will peer-edit with a classmate and the type of questions that they can ask, they work with a model essay with peer editing questions that the “writer” has asked.
(See link to a model exercise below.) After working with a sample, they then apply this technique to their own essays, starting with the Preparation Step.
Step 2: Preparing for Peer Editor. After students have written their essays, they identify specific parts of it in which they’d like a peer’s advice. These could be about the grammar in some sentences, clarification of an example, a need to add details etc. On a separate piece of paper, they write questions about these parts that they will ask a peer-editor. For example, “Look where I wrote #1. Is my example clear?” “Look where I have #4. Is there a problem with this sentence?” “Look at #8. How can I improve my conclusion?”
Step 3: Exchange papers. Students exchange essays with a partner and silently read them.
Step 4: Working with their Peer Editor. One partner will start by orally asking his/her editing questions. The peer editor does not see the questions. In other words, in order to make this an exchange of ideas, they don’t just trade their list of questions and write the answers. After hearing the advising partner’s (peer editor’s) advice, the writer can revise anything on his/her essay but does not have to. Also, the advising partner only gives solicited advice. In other words, the writer has control of the type of advice he/she gets
Step 5: Reverse roles.
This approach seems to have some clear advantages over the traditional approach. It involves critical thinking on the part of the writer. Instead of a teacher’s checklist determining what should be discussed, the writers themselves decide what advice/help they would like from their peers.
A by-product of this activity is that they can apply this when conferencing or discussing their papers with their instructor. Instead of students approaching their instructor with an essay draft and asking the instructor to read it and tell them how to improve it, students understand how to analyze beforehand and determined what they’d like help with from their instructor. This kind of skill will enable them to become more independent editors of their own writing.
Here is the model exercise that I use to introduce this approach Sample Peer Editing Writer asks Questions. If you’d like to read more about this approach, see Give the Writer not the Editor Control during Peer Editing in Writing Class
2) Writer-in-control peer editing. Type 2: Writers hear their essays read aloud.
Once students are aware of the types of questions they can ask during peer editing, they can easily and effectively do this version of peer-editing. Here are the steps:
Step 1) After students have written drafts of an essay, they are matched with a classmate (Student A / Student B). Beyond writing their essays, they do not prepare anything.
Step 2) They exchange essays and silently read them.
Step 3) Student B reads Student A’s essay aloud. (Notice: Student A does not read his/her own essay aloud.) Student A cannot see his/her essay. As Student A is listening to his/her essay, s/he can ask Student B to pause at any time in order to get advice or make an edit. Student B only gives solicited advice.
Step 4) They switch parts.
Step 5) Students have the option of revising their essays.
Notice: These two peer-editing activities are very user-friendly for the teachers. Their only role is to assign pairs, monitor, and be prepare to answer any questions the pairs might have. There is no pre- or post- paper work.
3) Fluency Writing: Reading, Speaking and Listening Culminating in a Writing Task
This is the perfect activity for integrating four skills into one activity. And it culminates in a writing task in which students focus on controlling their grammar and on their sentence style. It’s also one in which students can practice those two aspects of writing without having to spend time thinking about what to write.
These fluency activities can be used throughout a term when instructors would like to have students work on their grammar in a writing context and/or when they would like to add some group work in their writing classes. Also, it’s a good lead-in to teaching paraphrasing skills.
In brief, each student in a pair or triad is given a different part of a high-interest article and follows these steps:
1) Silently read their part to themselves.
2) Take turns reading aloud their part to their partner(s), who can only see their part of the article. They can ask the reader to repeat or explain parts.
3) After all parts of the article have been read, individually they write as many details as they can about the whole article without looking at the article. (A list of key words from the article are given to them to help them remember the details.)
In other words, they are not trying to think of ideas, only write about the details in the article. As a result, they can especially focus on their grammar and style.
These are relatively easy for instructors to mark as they are only giving feedback on grammar (i.e., marking grammatical mistakes) and not having to simultaneously evaluate the content since everyone’s content is the same.
And because students are not looking at the articles while writing, but instead only look at the “Key Words” to help them remember, they are learning paraphrasing skills, i.e., telling source information in their own words.
Another positive aspect of these is that the content of all the students is the same, so the instructor can easily compare the level of competency of each student’s grammar and style to the others in the class.
For more details about this activity, see Fluency Writing: Reading, Speaking In Pairs and Triads, For a sample activity that you can use with your students in pairs, see Fluency Man follows his dreams , and in triads, see Fluency How to Be More Likeable
4) Grammar Groups: Triads analyze grammar in sentences.
The format for these activities has been effectively used with students from lower level to advanced. And the structure of these activities makes it easy for even the most passive students to be active; in fact, many times, the normally quiet students seem to shine while doing these. Another positive aspect of these is that they are non-threatening for students to engage in.
Here is the basic format:
• Students are put in groups of three (or four): Student A, B and C.
• Each student is given a paper that is composed of two parts:
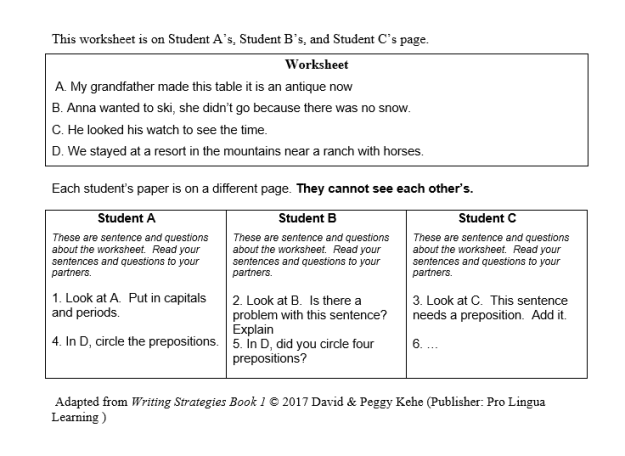
(1) “Worksheet” with a set of items or sentences.
These are the same on everyone’s paper. For example:
Sentence D. We stayed at a resort in the mountains near a ranch with horses.
(2) “Questions and directions” that are related to the items in the Worksheet. These questions are different for Students A, B and C.
For example:
Student A # 4: In Sentence D, circle the prepositions.
Student B # 5: In Sentence D, did you circle four prepositions?
- They take turns reading their questions / directions, and they fill out the worksheets, helping each other when necessary and confirming that they are filling in the items correctly.
- Students A has the first question, B the second and C the third etc. This way, they are all required to speak and stay engaged. Also, they are asked not to look at each other’s paper.
For more about this activity and an sample exercise that you can use with lower levels and another for higher levels, see • Engaging Grammar Group Activities (Even For Hesitant Students)
The four activities above can be used with any type of Writing unit. This next activity is more mode specific: Describe someone.
5) Describe a classmate (secretly).
All the students circulate around the periphery of the room, reading descriptions hanging on the wall of anonymous classmates and trying to determine who is being described in the lists, sentences or paragraphs. Typically, each student seems very focused on reading the descriptions, searching for the classmate who is the object of the description but also looking out of the corner of their eyes to see what kind of reaction others are having to the description that they secretly wrote. There is energy in the room, a lot of interacting and a lot of laughing.
In brief, the steps for this activity are:
1) The students are secretly assigned by the teacher to a classmate to describe.
2) They write a description. It can be a list (for lower levels) or a paragraph (for higher ones).
3) They give their papers to the teacher, who quickly looks at them to make sure that there is nothing inappropriate on them.
4) At random, the teacher returns the papers to the students, and each one tapes the one that they were given on the walls of the classroom. These have no names on them, only a number.
5) They move about the room, read the descriptions and write on a separate piece of paper the name of the classmate who is described.
6) When most students have finished #5, the teacher asks them to stop. Then as a whole class, they tell the teacher who they think was described on each paper, and the teacher confirms the correct answer.
Variation depending on the level of the students:
• For lower-level students, they can describe the physical appearance, e.g., clothes, hair, size etc.
• For students who are a bit higher, they can describe the personality, habits, backgrounds, unique characteristic or experience, or even say what job they’d be good at in the future.
The only tricky part of this activity can be assigning the secret numbers. I use a form that has been helpful for that: Describe your neighbor Form . For more about this activity, see • Writing Class Person Description Activity: Fun, Lively and Productive
David Kehe
